"Stencils allow children to explore the math behind the patterns. It is difficult for them to perceive the difference between 1/8 and 3/8 without visual aids in the beginning. Unlike charts, Etoys is interactive. Unlike paper or cardboard, it allows children to repeat any number of times without waste."
- K.K. Subramaniam (who created the Stencil code in squeak to make this possible)
So I used Stencils (which hopefully will be in an upcoming version of Etoys) to allow kids to explore fractions. See the example below:
Using this Etoy, kids, can create and explore their own fractions. Fractions can be made using the "Fractionator" (using the Stencil functionality) or by drawing lines to separate parts of the set.
The line drawing tool, allows you to create multiple segment lines by hitting the key to add a new segment (actually it simply adds a new vertice). If you hold down the a, you can get a behavior a bit like drawing (would be interesting to see how this behaves on a touch screen).
The "Fractionator" lets kids specify the number of parts. I would like to extend this so kids create their own fractionator tools by writing scripts to set the size of the Fractionator.
The last pages have an explanation of how the the "line drawing" scripts work. I used a magnifier and speech balloons to explain what was happening, it would be good to add step by step actions as you highlight each scripting tile.
What do you think? How can this be used? How can it be improved? Leave a comment.
Another great use of stencils can be found here: http://community.ofset.org/index.php/Grab_area_button This was done by Susanne Guyader, an 80+ year old artist who used Squeak/Etoys to guide art teachers in France.
This is a first draft of a tool to let teachers and students create fractions and fraction problems by "cutting" an object. The amazing thing is it only took 11 scripting tiles in Etoys (could have got it down to 7, but went for readability). The first page lets you make only 1 cut, the second lets you make multiple cuts. I had to put a playfield on top of the "unit" (aka rectangle, which is in a gridded playfield) so that I could allow you to "clear the cuts" by simply using the Playfields "remove all" tile from the collections category. With only 1 playfield the remove all would have removed my "unit" as well.
Next I am thinking about using polygons as my "units" so I can visually show the cut by duplicating the polygon and modifying the vertices to points where they intersect the cut. Then I will "animate the cut" by moving the polygon's apart. This should scale to multiple cuts without code changes (using the Playfield's "tell all contents" tile from the scripting category). Well at least I think it should testing and the mandatory debugging that occurs anytime I write code will tell ;)
So today (and actually for a number of days) I have been working on a "Fraction Maker" tool, to help create curriculum and playthinks for kids. I have been going through multiple iterations (a good habit to teach the kids).
Fraction Box w/Controls
The user can specify the object to use (in the above case I used a rectangle, but you could use any shape or graphic), the user can specify the # of rows and columns. The object used has information about the color changes (or other changes such as changing graphic) and whether the event occurs on MouseDown or MouseEnter. Hmmm, I think I should move that MouseDown or MouseEnter to the Fraction Object and just ensure each object used to "fill" the fraction has a "toggle" script.
Here are a couple of things I want the Fraction Box to be able to do:
When a user clicks on (or mouse's over) a box it will change color
Let user (teacher or kids) specify the colors
Button to hand the user a copy of the Fraction Box
Button to "lock" the Fraction Box (so the mouseEnter or mouseDown events stop changing colors)
Button to hand the user a copy of the Fraction Maker (Fraction Box + buttons)
Some challenges/design issues:
When "handing the user a copy of the box, unless I put a "border" (not an etoys border) around the "Fraction Box" it is not obvious how to "pick up" and move it. Ideally you could easily get the halo, but that doesn't work too well as I currently have the size of the playfield set to the size of the fraction box, so the only way to "select it" (get its Halo) is to "shift drag" select, which is easy to teach, but not obvious until you are shown how to do it (hmmm, sounds like I need another Etoys minute).
The scripting to do all I want to do (lock/unlock Fraction Box), etc. not hard it just takes time and some figuring out
The teachers in Uraguay were asking how they can create timelines. So I created a sample project in Etoys to demonstrate how it can be done. The timeline uses scripts that execute on "mouseEnter" (to show a speech bubble with more details) and "mouseLeave" (to hide the speech bubble. A script that executes on "mouseDown" goes to a specific page in the book with more details for that event. The following video demonstrates how it works:
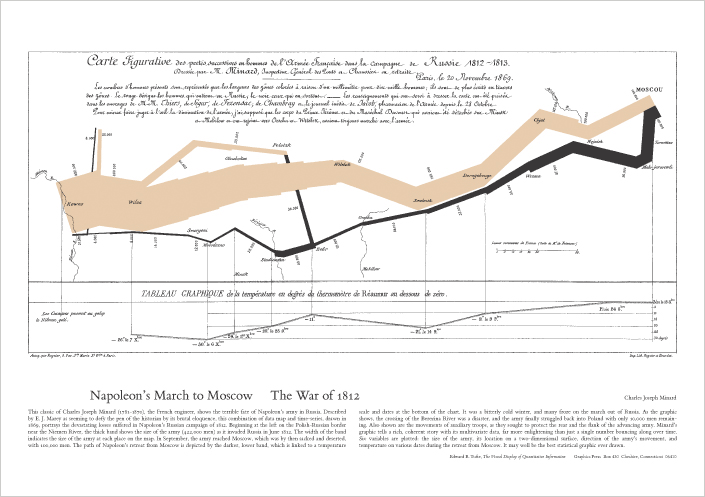
The timeline in the video and project are very simple and there are many examples of better timelines. For example from Edward Tufte the Charles Joseph Minard portrays the losses suffered by Napoleon's army in the Russian campaign of 1812. Check anything Tufte puts out its excellent. If you can attend his one day course, do it.
When in the Course of human events, it becomes necessary for one people to dissolve the educational bands which have connected them with past practices, and to assume among the powers of the earth, the separate and equal station to which the Laws of Nature and of Nature's God entitle them, a decent respect for the thoughts of children requires that they should declare the causes which impel them toward a new form of education.
We hold these truths to be self-evident, that all children are created equal, that they are endowed by their Creator with certain unalienable Rights, that among these are Life, Liberty and the pursuit of Learning.
That to secure these rights, Schools are instituted by Adults, deriving their just powers from their ability to facilitate children reaching their full potential and using their skills for the greater good. That whenever any form of education becomes destructive of these ends, it is the Right of the People to alter or to abolish it, and to institute new Schools, laying its foundation on such principles and organizing its powers in such form, as to them shall seem most likely to effect their Learning and Happiness.
This Etoy lets you play with number grids. Kids can click on tiles to color them. For example kids could color every 2nd tile, or use the tiles to create the Sieve of Eratosthenes. The grids start with zero, but we can modify to start with 1 as well. The grids are contained inside a holder so that you can resize them to see different patterns. Kids can use the feature that allows them to "color" the squares to document and report on the patterns they find. They could also write scripts to color every N tiles or create their own Sieve of Eratosthenes algorithm. I think this project would work well on a SmartBoard or touch screen device.
What do you think? How can this be used to teach, to learn? Do you have any links or ideas on lesson plans using a tool like this? Please share your thoughts and links, comment below or blog about it and let me know.
Export a images from your Etoys projects simply and easily. I have created two tools (with help from Bert for some initial Squeak scripting, its amazing what you can do with Squeak, we really need to find a way to transition kids from the tile scripting to writing Squeak).
The First Tool allows you to export a PNG image of the costume (what a player looks like on the screen) of any object (including playfields, so you get an image of the playfield and everythin in it!). Simply click on the box with a black dot (its a simple watcher for a player variable) and your cursor will turn into a cross hair (large thin plus sign), then click on the object for which you want a picture. Then you can use the objects Name as the file name (by clicking on or type the name you want.
You can also export images for each page in a book, by using the "Select Book" tool and clicking on a book (note you need to click on the edge of a book or you will get one of the objects inside it, if you do not select a book an exception will be thrown when you try to save the images). I will fix this (as soon as I get some more Squeak help from etoys mailing list ;)
I created two versions of the tool (actually three, but only two are Etoys projects).
The first is a Quick Guide you can install on your system (more on how you can create your own Quick Guides later). Check the comments on the squeakland.org post for how to install the Quick Guide. I need to document more and will do so in a future Blog post and in the Etoys Manual.
The second has the tools in a flap that you can easily share on all projects.
Flaps can be shared by all projects by getting the Flap's Halo, clicking on the menu and checking the box next to "shared by all projects". I made this simple for you in this project, by having the menu open when you open the project.
The third method involves exporting the Flap morph (this is a "non Etoys friendly" task). It has the advantage that I can simply drag the .morph file directly into any project and in one step I have the tool ready to use.
I created the first draft by exporting from Etoys and creating the first draft of this directly from Picasa. I eventually want to get to the point where we can post directly from Etoys (at least a good draft). Also we should be able to post from Etoys to Facebook, Blogger, Twitter (although as you can tell I see no point in saying anything in less than 140 characters ;) . . .
So I decided to try and figure a way to let kids model this problem in Etoys.
My first attempt used kedama to show the "soda molecules" moving around and let the kids move the soda into the eye dropper and then into the coke glass and back.
I then decided on using a simpler approach using a set of 10 Sprite boxes in a container and 10 Coke boxes in a container. And asked the kids to move the 2 Sprite boxes into the Coke container, then shuffle the Coke container and take the top four boxes and move them back to the Sprite container. And have them do this a few times and think about how this relates to the Coke v Sprite problem.
The completed project is here, but I think it might be better to walk the kids through building a model themselves.
Finally the simplest approach at a table with a deck of cards using 10 red cards and 10 black cards. When I did this with my son, who had also seen the other two methods, he just kept shaking his head and muttering things like "that's crazy, it doesn't make sense". He believed what he saw but it so went against the model he had in his head there was major cognitive dissonance. I told him this was great, when you find something that seems really couter-intuitive, but the evidence proves its true you are really onto something and learning.
I liked this approach best (sometimes its best to "step away from the computer ;).
What to you think? How can we use this problem to help kids learn?
This Etoy Minute was created in response to an email on the OLPC mailing list, where someone asked for a program to do word sorts. So I created an Etoys project which is hopefully easily modifiable by others to allow folks to create their own Word Sorts (an activity where students arrange groups of words/picture by common characteristics, such as spelling patterns, meaning, sounds or other shared characteristics)
In the video and in the Etoys project I created a button to duplicate a page, I think this was making it too easy, I should have simply shown folks how to duplicate a page from the book menu (the menu icon at the top of the book between the next page and previous page arrows. If you click on it is has an option "duplicate page".
Feedback and suggestions for improvements always welcome.
Balance Scales is part of a set of the ELVM (Etoys Library of Virtual Manipulatives) I am working on. The advantage of ELVM's over other Virtual Manipulatives is that being in Etoys the kids and teachers can not only play with them, but also:
Use them in journal entries created in Etoys
Kids and Teachers can create their own versions of the EVLMs
Look inside and see how they work (just get the halo and look at the scripts)
Suggestions and feedback always welcome. If you have a request for a new Etoy Minute or a new Etoy project you can use in your classroom, simply post a comment here and I will get back to you.
With Etoys, children can draw their own sketches then bring them to life by writing "scripts" that tell the sketches what to do. This post will explain how you can specify when scripts should run.
After watching the video, see if you can figure out what "MouseDown" and "MouseStillDown" do. Play around and run some tests to figure it out.
You can also learn about scripting by reading excerpts from the soon to be released Etoys Manual or just playing around and running some tests.
Excerpts from soon to be release Etoys Manual
3.6 Script Editor
Although some object actions can be controlled in the object's viewer, the script editor is where you assemble the tiles to create more complex actions or scripts. In the script above two of the object sketch's tiles have been dragged from sketch's viewer and dropped into the Script Editor. When the tile is in place to be accepted by the Script Editor, the area around the tile turns green and when the tile is released an audible click is heard if sound is enabled.
The Script Editor allows you to assemble tiles and test out your ideas for creating a simulation in the Etoys world. Getting into the habit of testing your ideas is a very powerful concept. You can use the results of these test scripts to simulate and determine the attributes and behaviors of the objects in your world. Getting into the habit of testing your ideas or at least thinking about how you could test your ideas (and what other people tell you is true) is a wonderful "habit of the mind". Let your imagination reign.
Collapse button
The round brown button with the black enclosed circle at the upper left collapses the script back to the viewer. The script can always be viewed in the Script Editor again by dragging it out onto the world from the object's viewer. Name of the Player being Scripted.
The text to the right of the collapse button is the name of the object for which you are creating the script. You can not change the objects name here.
Name of script.
The text to the right of the object's name is the script's name. It's a good idea to give a good name to the script (e.g. If its a script that moves the player, you can call the script 'move', etc.). Exclamation point.
The yellow exclamation point in the center of the Script Editor runs the script one time. You can also run the script from the object's viewer as shown above.
Tickindicator
The TickIndicator is the clock face to the right of the yellow exclamation point. The TickIndicator is light green when not in use, pink when script is paused and blue when script is ticking. Hold mouse button down and a menu pops up. There you can set the rate at which the script should run. The default is 8 ticks a second. Predefined in the menu are choices from one tick to 100 ticks a second. Last menu option is called other... Here you can type in the number of ticks per second that you want the script to run. A tick rate of 0.5 indicates one tick every other second, 0.1 once every 10 seconds, etc. ScriptStatusControl
This appears to the right of the clock. Click it to get the following menu of options:
normal - run when called
paused - ready to run all the time, will change to "ticking" Status when you press the "Go" button in the "All Scripts" object.
ticking - run all the time, will change to "paused" Status when you press "Stop" button in the "All Scripts" object
mouseDown - run once when mouse goes down the object
mouseStillDown - run while mouse still down on the object
mouseUp - run once when mouse comes back up off the object
mouseEnter - run once when mouse enters the object's bounds with the button up
mouseLeave - run once when mouse exits the object's bounds with the button up
mouseEnterDragging - run once when mouse enters the object's bounds while dragging another object
mouseLeaveDragging - run once when mouse exits the object's bounds while dragging another object
opening - run once when the object is being opened, this only works for World and Pages (contained in a book) objects.
Pop Quiz: Can you figure out how to use this to ensure a Book always opens to the first page when a project is opened? Can you figure out how to use this to reset a Page each time it is opened?
closing - run once when the object is being closed. This only applies to World and Pages objects.
More events:
connectedTo - run once immediately after a connector has connected to the object
disconnectedFrom - run once immediately before a connector is going to disconnect from the object
KeyStroke - executed when any key is pressed, this is only available from World and Playfield scripts
acceptedTextContents - executed when text is accepted, which can be when you tab to the next text field or hit return (if accept on CR is checked), this is only available for Enhanced Text objects.
Gold chest.
Clicking on the gold chest to the right of the ScriptStatusControl allows access to the following special tiles:
test tile
This tile has three holders into which you can place one or more tiles: Test: You can place any tile that contains an attribute of any object. For example, you could test whether Ellipse's y value is less than 5 as shown. To accomplish this grab the left side of the Ellipse's y tile from Ellipse's viewer. Make sure you aren't to the right of the tile and have the red box surrounding Ellipse's y and its value at the right, because then you will obtain an assignment phrase for the tile and not its attribute. You can test on almost any attribute (numeric, color, graphic, etc) of any object.
Pop Quiz: How could I define a test to see if a car passed a finish line in a race? Yes: Tiles placed in the "Yes" holder will be executed when the "Test" is true. If y<5, then Ellipse will turn blue.
No: Tiles placed in the "No" holder will be executed when the "Test" is false. If y>=5, then Ellipse will turn blue.
Note, that many tiles can be used in the "Test" holder of the "Test Yes No" tile. Some can also be used as watchers, which can be useful when debugging your scripts. While you may think a "Sketch obtrudes" or a "Sketch is under mouse" the Etoys system may think differently. Being able to see this as a script runs can help.
repeat tile
This tile has one holder called "do" into which you can place a script:
You can repeat the script you drop into the "do" placeholder the number of times set in the number box at the top of the tile.
random tile
The random number will range from 0 to the number in the number box (in this case 5). It can be dropped into the end of a command that requires a number or function. This is a special case of a function tile.
function tile
You can choose a function by clicking on the arrows at the left or clicking on the function name (in this case "abs") to get a drop down list of functions to choose from. Most of the common functions are available in the list. The function can be dropped into the end of a command that requires a number or function.
button up?
Used in Test and its value is true when the mouse is NOT pressed down.
button down?
Used in Test and its value is true when the mouse is pressed down anywhere.
tile representing the player
In this case the player is Ellipse.
number
A number box that can be dropped into the end of a command that requires a number or function.
Script editor menu
The Script Editor Menu button appears on the far right. It has the following options. add parameter
This option adds a parameter to the script. The parameter is passed into the script when it is called from another script. For example if you can create a script that will move an object forward based upon the number, you can add a parameter of type number. Then call that script from one or more other scripts passing in a specific value as the number. To use the parameter in the script simply drag the parameter from the Script Editor's in the top line to the right of the scripts name into your script where any number data type can be used.
There following are the data types that can be used as parameters:
Boolean (true or false)
BorderStyle
ButtonPhase
Color
Graphic
ImageResolution
Number
Patch
Point
ScriptName
Sound
String
TrailStyle
button to fire this script This will create a button object that can be used to fire the script. You can change the button's label from the menu in its viewer by selecting change label. show arrows
When selected the arrows inside scripting tiles will be displayed (ex: the up and down arrows to increase numbers and the left and right arrows to remove and parts of the expression edit balloon help for this script
This edits the balloon help that is shown when you hover over the script name in the scripts category of the Objects Viewer
explain status alternatives
Opens a window with descriptions of the options for "when this script should run" (ex: normal et al)
show code textually Will provide a text version of the script which you can edit. This provides an entry into Squeak programming. To save your changes type show code textually Will provide a text version of the script which you can edit. This provides an entry into Squeak programming. To save your changes type <ctrl><s> (on PC and XO) <cmd><s> (on Macintosh) when done. Note once changes are made you can not revert back to tile scripting without losing your changes. save this versionWhen editing the text version of a script you can use this menu option to save the changes. grab this object Will move the object to the position of the mouse and you can drag it to where you want to place it.
reveal this object Will display the halo for this object so you can find it. This can take a second or two.
tile representing this object Will create a tile representing the script's Object. Tiles representing an object can be used in this or other scripts to replace the Object being acted upon in a script.
open viewer Will open the viewer for this script's object
destroy this script Will destroy this script.
4.9 Viewer Category Scripting
This starts the given script ticking. You can select from available scripts at the right of the tile.
This makes the given script be "paused". You can select from available scripts at the right of the tile. Note: If the script specified is the script containing this tile, the script will not pause until it finishes its current processing of the all the tiles in the script. For example, if you have a "Object forward 5" tile after a "Object pause script script1" tile in a script named "script1", the object will move forward 5.
This makes the given script stop or revert to "normal". You can select from available scripts at the right of the tile.
Note: If the script specified is the script containing this tile, the script will not stop until it finishes its current processing of the all the tiles in the script. For example, if you have a "Object forward 5" tile after a "Object stop script script1" tile in a script named "script1", the object will move forward 5.
This starts the given script and all of its siblings's scripts ticking in the object. You can select from available scripts at the right of the tile.
This makes the given script and all of its sibling's scripts be "paused" in the object. You can select from available scripts at the right of the tile.
Note: If the script specified is the script containing this tile, the script will not pause until it finishes its current processing of the all the tiles in the script. For example, if you have a "Object forward 5" tile after a "Object pause all script1" tile in a script named "script1", the object will move forward 5.
This make the given script and all of its sibling's scripts stop or revert to "normal" in the object. You can select from available scripts at the right of the tile.
Note: If the script specified is the script containing this tile, the script will not pause until it finishes its current processing of the all the tiles in the script. For example, if you have a "Object forward 5" tile after a "Object stop all script1" tile in a script named "script1", the object will move forward 5.
This sends a message to all siblings to run the given script once. The object that executes this will not have its script run, only its siblings will run the script once. You can select from available scripts at the right of the tile.
This runs the given script once, on the next tick. You can select from available scripts at the right of the tile.
This runs the given script in the object and in all of its sibling once. You can select from available scripts at the right of the tile.
Pattern Blocks and Transformation Tools is an Etoys project to provide teachers and learners a simple free tool to explore ideas using Pattern Blocks. The transformation tools also allow kids to create their own transformation scripts by simply dropping the transformation tiles into a Etoys holder.
There is also a "Guess Who I Am" game on Page 2 where kids can create their own version of the game by dragging in or creating pictures and embedding them in the Polygons.
Here is a video showing how it works:
Kids can create their own transformation and simple animations using Transformation Scripting. The Pattern Blocks can also be used to explore fractions. To see how the scripts work the simplest way is to look for yourself. Get the viewers from the transformation tiles and look at the "doIt" scripts for each object. I used a Player Variable which we will discuss in an upcoming post




 Used in Test and its value is true when the mouse is NOT pressed down.


